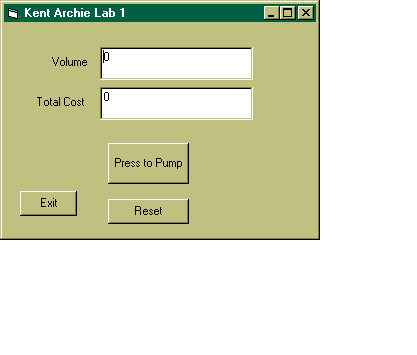
This is a simple exercise to make sure you know how to start up and use the development tools you will be using all term. It also practices generating a lab report. About the only way to get this wrong is to not turn it in. The following is step by step how to create a small application in Visual BAsic. Chapter 2 in the book does something similar so it may help to look in there if you get stuck or can't follow what I wrote.
Step one.
From the Start button (or maybe there is an icon on the screen), start
Visual Basic running.
Select the 'Standard EXE' choice in the little window and press open.
On the right is a window labeled 'Properties Form1'.
We will change a couple of things there.
The properties window is divided into two columns.
The left one is the property name and the right one is its value.
First change the '(Name)' property from 'Form1' to 'Lab1'.
Then change the Caption to 'your name - lab 1'.
Now lets save the project. Under File, select Save As. Then pick a directory to save your project. If you plan to keep your project on a floppy, save it to the local hard drive for now and copy the folder to the floppy later. If you have network space, save the project there.
We will need two text boxes for out program. First, on the far right of the display is a set of controls. We want to click on the little box with the letters 'ab' in it. If you let the mouse hover over one of the controls you should see 'TextBox'. Move over to the gray area with the little dots. Somewhere near the center, close to the top, draw a box. Towards the bottom of these instructions is a picture of how the whole thing should look to give you an idea of where to put things. I don't care if everything is positioned just like mine, as long as all the same controls are there. We need two boxes so repeat what you did above and line the second one up and below the first.
When you click on one of the boxes, you will see its properties over on the right. For the upper box, change its name to 'Gallons' and put a 0 (zero) in the 'Text' field. The second box should also have a 0 in the 'Text' field and its name should be 'Cost'. Do a save again. A dialog box should pop up asking or a name. The default is 'Project1'. You can change it to 'Lab1'.
Labels are next. Under the controls list, this the the icon looking like a large letter A. Select it and in the form box, draw the label just to the left of the Gallons box. You can leave the name as 'Label1', but change the 'Caption' field to 'Volume'. Create a label for the other box and change its caption to 'Total Cost'. And save again.
Now we need buttons, three of them. The tool for this looks like a small button. Select this and draw one button just under the boxes. Make it kind of large. Change its Caption property to 'Press to Pump'. Its Name should be 'Pump'. Make two more smaller button below the pump button. One should have a Name and Caption of 'Reset' and the other should have a Name and Caption of Exit. And Save again.
All the form elements are in place now. So we start adding code. Simplest one first. Double click on the 'Exit' button. A window will open up and have text in it that looks like:
Private Sub Exit_Click()

End Sub
Between those two line, you add lines so it looks like this:
Private Sub Exit_Click()
    End
End Sub
Close this little window and Save.
Double click on the 'Reset' button and change the code that looks like:
Private Sub Reset_Click()

End Sub
to be
Private Sub Reset_Click()
    Gallons.Text = 0
    Cost.Text = 0
End Sub
Now on to the Pump button.
Double click again and change
Private Sub Pump_Click()

End Sub
to
Private Sub Pump_Click()
    Dim curGals As Single
    Dim curCost As Single

    curGals = Val(Gallons.Text)
    curCost = Val(Cost.Text)
    Gallons.Text = curGals + 1
    Cost.Text = Format((curCost + 1.52), "Fixed")
End Sub
And Save again.
If everything happened correctly, you should be able to run the program now. Under the 'Run' menu, select 'Start'. Or you could press the F5 function key. The window you made should show up and you can click on buttons to see what happens.
And that's it.
Follow the deliverables instructions below and your done.
Feel free to play with the controls and properties to see what happens.
Best to do this on a copy though.
Here is a picture of what the form should look like.
Yours does not have to be exactly like this but it should
be similar.

ASK if you have any questions.